
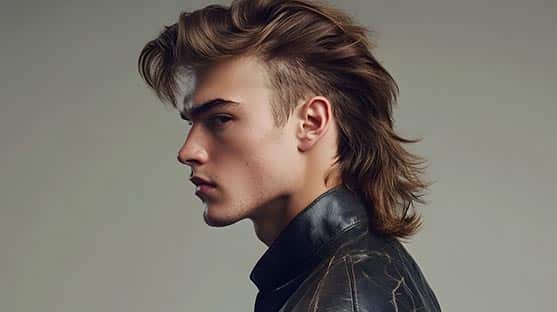
Few haircuts are as instantly recognizable as the mullet. Defined by shorter hair around the front and sides with more length at the back, the cut has moved far beyond its retro reputation. Modern versions can be soft and shaggy, sharply faded, curly, cropped, or long enough to reach the shoulders.
If you are considering a mullet, the most important decision is not simply whether to get one. You need to adapt the cut to your hair texture, face shape, styling habits, and preferred level of contrast. The steps below can help you choose a version, communicate it to your stylist, and maintain the shape as it grows.
Step 1: Decide how modern or classic you want your modern mullet
Start by deciding how much contrast you want between the front, sides, and back.
A classic mullet typically has stronger separation, more structured texture, clearly shorter sides, and pronounced length at the back, creating the familiar business in the front, party in the back contrast.The hairstyle became popular in the 70s and 80s, especially in the 1980s among musicians and athletes. Modern versions usually introduce softer graduation, more layering, and greater flexibility in the fringe, crown, sides, and back, and the look has moved through ridicule and revival in pop culture over decades.
A modern mullet may overlap visually with a shag or wolf cut because all three can use extensive layering and texture. The main difference is the silhouette. A mullet deliberately emphasizes extra length toward the back, while a shag tends to distribute layers more broadly. That adaptability is part of why it remains relevant in current fashion.
You do not have to choose a strictly classic or modern version. Your stylist can combine features from several styles according to how subtle or dramatic you want the result to be, and it can also signal rebellion, self-expression, and community identity.
Step 2: Match the classic mullet to your face shape
Most people can adapt a mullet to their features because it is not one fixed haircut. Fringe length, side volume, crown height, layering, and back length can all be changed.
If you want to explore the look before making a major haircut change, Facefy provides a useful starting point for visualizing how a mullet could work with your overall appearance. You can also use Facefy to find your face shape and consider those proportions alongside your hair texture and preferred style.
For a rounder face, reducing excess width at the sides and keeping some height or movement through the top can create a more elongated visual effect. Square or angular faces can work with either a structured mullet or softer layers around the face.
Longer faces may benefit from avoiding excessive crown height, while heart-shaped faces can experiment with fringe and side texture. Treat these as starting points rather than strict rules.
Step 3: Choose a mullet for your hair type
Your natural texture has a major influence on how the haircut will look and how much styling it requires.
Wavy hair naturally gives layered mullets movement and definition. Curly hair can create volume through the crown and back, producing a rounded, textured silhouette. Straight hair may benefit from strategic layering and lightweight styling products that create separation.
With fine hair, lighter layering can help preserve visible density while adding movement. Thick or coarse hair may need thoughtful weight removal to prevent the crown and sides from becoming overly bulky.
Your lifestyle matters too. For conservative grooming preferences, consider a low-contrast version with softly blended sides. If you want the haircut to stand out, faded sides, a shorter fringe, or dramatically longer hair at the back can emphasize the shape.
Step 4: Pick the type of mullet hairstyles you want
Once you understand the basic silhouette, choose the variation or mullet style that most closely matches your preferences.
A classic mullet keeps pronounced contrast between the shorter front and sides and a slightly longer back. A modern mullet uses softer transitions and layered texture for more visual interest. A shag mullet adds extensive layering through the crown and back for a tousled finish, while a wolf cut mullet combines crown volume with thinner, longer sections toward the back for a sharper modern edge.
A taper fade mullet uses a taper or fade around the sides while preserving length at the nape, and this direction sits alongside other contemporary fades. A curly mullet works with natural curls to create volume and definition. A micro mullet keeps the length difference relatively subtle, while a long mullet preserves substantial length at the back and often falls onto or past the shoulders. A more defined outline can also catch the eye.
These features can also be combined. Instead of focusing only on a style name, decide what you want for the fringe, side length, crown volume, texture, and back.
Step 5: Check whether your hair is long enough
There is no universal minimum length for a mullet because the required amount depends on the version you want. The defining feature is relative length. The back needs to remain noticeably longer than at least some of the hair around the front or sides.
If your hair is already medium length, your stylist may be able to create the silhouette immediately by removing length from selected areas while preserving the back. Starting with very short hair usually means growing the nape and back while periodically shaping the sides and top.
Before booking, check whether the back has enough length to create visible contrast and whether the crown has enough hair for your preferred layering. If you do not yet have sufficient length, ask for a transitional haircut rather than shortening the back prematurely.
Step 6: Visualize the overall mullet style before cutting
Reference photos are useful, but comparing different directions before committing can make your consultation more productive.
If you are uncertain about the fringe, side length, or overall silhouette, Facefy can help you explore hairstyle directions before the haircut. Facefy’s AI Hairstyle Try-On can also help you visualize different looks and narrow down the references you want to show your stylist.
Treat virtual previews as inspiration rather than exact predictions. Your final haircut will still depend on hair density, texture, growth patterns, current length, styling, and your stylist’s technique.
Step 7: Tell your stylist exactly what you want
Simply asking for a “mullet” does not provide enough information (the modern term was popularized in the 1990s). A micro mullet with softly tapered sides and a shoulder-length shag mullet require very different cutting decisions.
The etymology of the word and its exact origin are debated, but the meaning behind “mullet head” was pushed into wider use when the Beastie Boys popularized the modern label, even as earlier style icons like David Bowie had already put the look on many a head.
Bring several reference images when possible, including front, side, and back views. Bring references that show the specific style you want, not just a general idea, and explain which specific elements you like rather than asking your stylist to reproduce another person’s haircut exactly.
Discuss how much contrast you want between the sides and back. Specify whether you prefer a fade, taper, or fuller sides. A clean explanation of the back shape and fringe helps avoid mismatched expectations. Explain how much length you want to retain at the nape and whether you prefer a blunt, wispy, textured, or longer fringe.
Try to include reference photos showing a hair texture similar to yours. Heavily styled photographs may not show how the haircut behaves during everyday wear.
Step 8: Style your mullet at home
Styling should support the haircut’s existing shape rather than fight against your natural texture.
For wavy or curly hair, apply a small amount of curl cream or lightweight styling product while damp, then scrunch gently and air-dry or diffuse.
For straight or fine hair, light texturizing spray or mousse can add separation and lift. Concentrate volume around the crown instead of coating every section with heavy product.
Thick or coarse hair may benefit from smoothing products to control unwanted expansion while keeping the layers visible. Avoid excessive wax, cream, or gel because too much product can reduce the movement that gives the haircut its shape.
Step 9: Maintain and grow out your mullet
How often you need a trim depends on the variation, but regular trims every 6-8 weeks help maintain the shape of mullet mullets. Closely faded sides show regrowth sooner than a shaggy, softly blended mullet. Fringe may also require attention before the back needs shortening.
Between appointments, maintain your hair’s condition with products appropriate for your texture. When growing the haircut out, avoid immediately removing the longer back. Allow the sides to catch up gradually while your stylist softens the contrast and redistributes the layers.
A mullet can eventually transition into a shag, longer layered haircut, or layered bob depending on your starting length and goal, and regular maintenance helps it keep looking intentional as it grows out.
Final thoughts
A successful mullet should look intentional from the front, sides, and back, not simply long at the nape. Start by deciding how much contrast you want, then consider your face proportions, natural texture, fringe, crown volume, side length, and maintenance preferences.
Bring clear references to your stylist and explain the individual details you like. With the right proportions and customization, the haircut can range from understated and wearable to deliberately dramatic while still reflecting your personal style.
This content is provided for informational purposes only and is not a substitute for professional advice. AFP editorial staff were not involved in the creation of this content.


 Share
Share